- In this blog, I’ll explain the whole Physical AI stack, from the robot’s head out to the cloud, with one robot at the center.
- Lessons for each part are grouped into four levels: Overview, Basics, Advanced and In practice. I’ll publish the overview lessons first.
- I started this blog to share my experience working on Physical AI, and to sort out my own thinking along the way.
The home page of this blog shows a single robot. You can click the robot’s head or arms, or the simulator or the cloud around it. Wherever you click, you’ll go to lessons on the technology behind that part.
That one picture sums up what this blog sets out to do. From here on, with one robot at the center, I’ll walk through the whole Physical AI stack step by step, from the robot’s body out to everything around it. I started this blog to share the experience I’ve built up working on Physical AI, and to sort out my own thoughts and knowledge along the way.
How this blog is organized
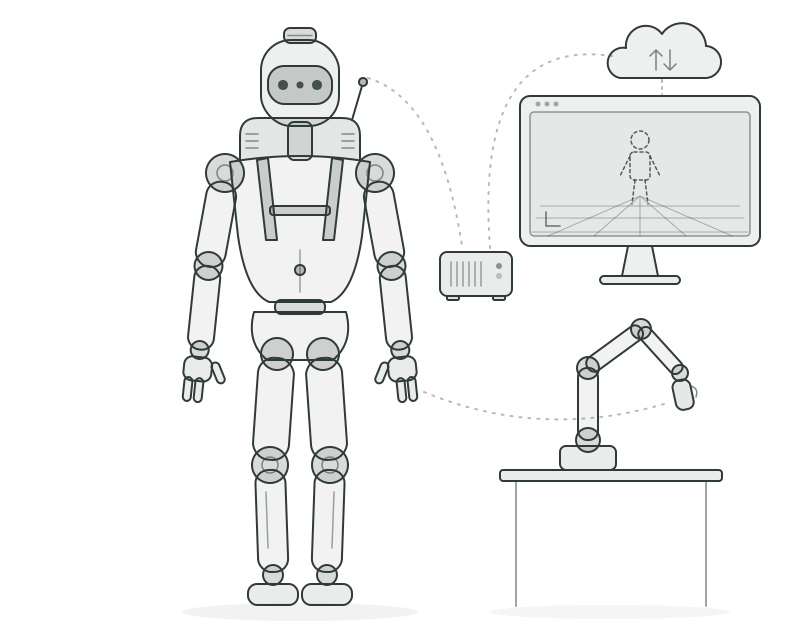
Figure 1. Robot map. On the home page you can click the robot’s five body parts (head, torso, arms and hands, legs, backpack) and the four components around the robot (leader arm, simulator, edge server, cloud).
This picture shows a generic setup based on publicly available robots and tools. The head sees its surroundings (perception), the arms and hands handle objects (manipulation), and the legs walk and find their way (locomotion and navigation). The torso keeps the robot balanced and carries commands to the rest of the body, and the backpack on its back holds the computer that does the robot’s own processing (the on-board computer).
The four components around the robot support it from outside. With the leader arm, a person moves the robot directly to record demonstrations. In the simulator, a virtual robot is trained and data is collected. The edge server handles inference for models too heavy to run on the robot itself, and the cloud trains models on the collected data. For a robot to work properly, these four components matter as much as the five body parts, because data collection, training and some of the inference happen outside the robot.
Click any part and you’ll find its lessons in four levels.
| Level | What the lessons cover |
|---|---|
| Overview | In 5 to 10 minutes, learn what role this part plays in the robot and where it fits in the overall structure. Nothing extra to install. |
| Basics | Do your first hands-on practice with publicly available tools. |
| Advanced | Work through the principles and equations, and change the values to see how the results change. |
| In practice | Learn how to find and diagnose the problems that come up where several parts connect. |
For each part, I’ll publish the overview lesson first. The remaining lessons are listed as “Coming soon”, and I’ll post them one by one as they’re finished.
Each part runs on its own cycle. A motor driver’s current control loop typically runs thousands to tens of thousands of times per second, while retraining a model on new data happens once every few days or weeks. How these components, each running at its own speed, mesh together like gears will get a lesson of its own.
Who writes this blog
I came into this field through research on using reinforcement learning to train robots for manipulation. The hardest part back then was the lack of material to learn from. That’s because the field was just getting started: big companies had yet to announce architectures like VLA (vision-language-action models), and transformers were not yet widely used in Physical AI.
By today’s standards, that experience may be a little dated. Still, I think there are things I can see precisely because I went through that period. Teleoperation, VLA models, sim2real, real2sim and reinforcement learning are widely used today, and I have a fair understanding of what problems each one set out to solve and how it has developed since.
These days I’m an engineer doing R&D on Physical AI for industrial use.
How I write and review
Each article takes me about a week to write and review. Actually, the first article was supposed to be the one I mentioned above, on how the components mesh together. Once I actually started writing it, I found a lot that needed checking and refining, so this introduction went up first.
Even if it’s slow going, I want to write articles that readers enjoy and can trust enough to follow along.
Wrapping up
I’m still sorting out my thoughts as I share my experience, so if you spot a mistake or know a better way to explain something, please let me know. You can leave a comment on any article, and anything you’d rather not share publicly can go in a private comment. You’re also welcome to reach me on GitHub or by email (see the about page).
Starting with the next article, I’ll pick the components of the robot and its surroundings one at a time and cover each in an overview lesson.
Cite this lesson
@misc{ljh2026whythisblog,
  title  = {Why I'm starting this blog},
  author = {LJH},
  year   = {2026},
  url    = {https://leejh.dev/en/lessons/why-this-blog/}
}
Comments